Docker container networking
Default networks
docker 提供了三个
内建(built-in)网络$ docker network ls NETWORK ID NAME DRIVER SCOPE ad747e2a983c bridge bridge local 3c2b536039ac host host local ffa7c88de9e4 none null local内建 bridge网络为docker0, 可以通过ip addr show或ip a或ifconfig查看$ ip addr show docker0 5: docker0: <NO-CARRIER,BROADCAST,MULTICAST,UP> mtu 1500 qdisc noqueue state DOWN group default link/ether 02:42:68:2f:d5:ec brd ff:ff:ff:ff:ff:ff inet 172.17.0.1/16 scope global docker0 valid_lft forever preferred_lft forever inet6 fe80::42:68ff:fe2f:d5ec/64 scope link valid_lft forever preferred_lft forever启动容器的时候,通过
docker run --network=<network>指定容器所在的网络。否则默认使用内建的bridge。
Running on Docker for Mac or Docker for Windows?
If you are using Docker for Mac (or running Linux containers on Docker for Windows), the
docker network lscommand will work as described above, but theip addr showandifconfigcommands may be present, but will give you information about the IP addresses for your local host,not Docker container networks.This is because Docker uses network interfaces running inside a thin VM, instead of on the host machine itself.To use the
ip addr showorifconfigcommands to browse Docker networks, log on to a Docker machine such as a local VM or on a cloud provider like a Docker machine on AWS or a Docker machine on Digital Ocean. You can usedocker-machine ssh <machine-name>to log on to your local or cloud hosted machines, or a directsshas described on the cloud provider site.
none网络将容器加入到一个container-specific网络堆栈中。这些容器没有网络接口
### 将容器加入 none 网络
$ docker run -it --rm --network=none busybox

### 以下为容器内
/ #
/ # cat /etc/hosts
127.0.0.1    localhost
::1    localhost ip6-localhost ip6-loopback
fe00::0    ip6-localnet
ff00::0    ip6-mcastprefix
ff02::1    ip6-allnodes
ff02::2    ip6-allrouters
/ #
/ # ifconfig
lo        Link encap:Local Loopback
          inet addr:127.0.0.1  Mask:255.0.0.0
          UP LOOPBACK RUNNING  MTU:65536  Metric:1
          RX packets:0 errors:0 dropped:0 overruns:0 frame:0
          TX packets:0 errors:0 dropped:0 overruns:0 carrier:0
          collisions:0 txqueuelen:1
          RX bytes:0 (0.0 B)  TX bytes:0 (0.0 B)
注意: 使用
CTRL-p CTRL-q命令可以退出容器同时保持容器运行。
host网络将容器加入到宿主机网路堆栈。- 容器一旦加入
host网络中,那么容器和宿主机之间不再有网络隔离。 - 举个栗子,
host网络中的某个容器启用了 80 端口,那么宿主机也就启用了 80 端口
- 容器一旦加入
## default bridge network

$ docker run --rm -itd --name=nginx_docker0 nginx
88d13e3a1bc23d0f03d17c5dce6bd12d32643c9930c96f51b38ae1462be35177

$ netstat -tunpl
(Not all processes could be identified, non-owned process info
 will not be shown, you would have to be root to see it all.)
Active Internet connections (only servers)
Proto Recv-Q Send-Q Local Address           Foreign Address         State       PID/Program name
tcp        0      0 0.0.0.0:22              0.0.0.0:*               LISTEN      -

$ curl 127.0.0.1
curl: (7) Failed to connect to 127.0.0.1 port 80: Connection refused

$ docker stop nginx_docker0
nginx_docker0


## host network

$ docker run --rm -itd --name=nginx_host --network=host nginx
af543af4dc4fdf44142642cc5978591fd56ee4dd4acddc16426102ae24971d40

$ netstat -tunpl
(Not all processes could be identified, non-owned process info
 will not be shown, you would have to be root to see it all.)
Active Internet connections (only servers)
Proto Recv-Q Send-Q Local Address           Foreign Address         State       PID/Program name
tcp        0      0 0.0.0.0:80              0.0.0.0:*               LISTEN      -
tcp        0      0 0.0.0.0:22              0.0.0.0:*               LISTEN      -

$ curl 127.0.0.1
<!DOCTYPE html>
...省略..
</html>

$ docker stop nginx_host
nginx_host
none和host网络不能通过 Docker 直接管理, 但是built-in bridge可以。用户自建(user-defined) bridge网络也可以通过 Docker 直接管理
The default bridge network
- 使用
docker network inspect <network_name>查看网络信息
$ docker network inspect bridge
[
    {
        "Name": "bridge",
        "Id": "ad747e2a983c7004e92ec878e7c634ee3f0312278b71366f3f0285a713ea8f52",
        "Created": "2017-09-18T09:23:24.488923085+08:00",
        "Scope": "local",
        "Driver": "bridge",
        "EnableIPv6": false,
        "IPAM": {
            "Driver": "default",
            "Options": null,
            "Config": [
                {
                    "Subnet": "172.17.0.0/16",
                    "Gateway": "172.17.0.1"
                }
            ]
        },
        "Internal": false,
        "Attachable": false,
        "Ingress": false,
        "ConfigFrom": {
            "Network": ""
        },
        "ConfigOnly": false,
        "Containers": {},
        "Options": {
            "com.docker.network.bridge.default_bridge": "true",
            "com.docker.network.bridge.enable_icc": "true",
            "com.docker.network.bridge.enable_ip_masquerade": "true",
            "com.docker.network.bridge.host_binding_ipv4": "0.0.0.0",
            "com.docker.network.bridge.name": "docker0",
            "com.docker.network.driver.mtu": "1500"
        },
        "Labels": {}
    }
]
启动两个 busybox 容器,并加入到 默认 bridge 网络
$ docker run --rm -itd --name=container1 busybox
b09c8abd1eb1cb1d12deb0da841bba45392e1ee3c0f4b6222c472568c6e4d932

$ docker run --rm -itd --name=container2 busybox
22a09d5501560c26096d985cc8be074a778dd047a960de3c8380419dfe50794f
启动容器后,重新 inspect 查看网络信息,会发现两个容器的网络信息也在里面
$ docker network inspect bridge
[
    {
        "Name": "bridge",
        "Id": "ad747e2a983c7004e92ec878e7c634ee3f0312278b71366f3f0285a713ea8f52",
        "Created": "2017-09-18T09:23:24.488923085+08:00",
        "Scope": "local",
        "Driver": "bridge",
        "EnableIPv6": false,
        "IPAM": {
            "Driver": "default",
            "Options": null,
            "Config": [
                {
                    "Subnet": "172.17.0.0/16",
                    "Gateway": "172.17.0.1"
                }
            ]
        },
        "Internal": false,
        "Attachable": false,
        "Ingress": false,
        "ConfigFrom": {
            "Network": ""
        },
        "ConfigOnly": false,
        "Containers": {
            "22a09d5501560c26096d985cc8be074a778dd047a960de3c8380419dfe50794f": {
                "Name": "container2",
                "EndpointID": "e961a9a1d1690026b0e0be0b82d3c5f192728bd4f994571bbc7be70102c8c467",
                "MacAddress": "02:42:ac:11:00:03",
                "IPv4Address": "172.17.0.3/16",
                "IPv6Address": ""
            },
            "b09c8abd1eb1cb1d12deb0da841bba45392e1ee3c0f4b6222c472568c6e4d932": {
                "Name": "container1",
                "EndpointID": "48969713f853fcebe8ed578420f0d9935f3f41c7911a09aedc61b0aa016c52e0",
                "MacAddress": "02:42:ac:11:00:02",
                "IPv4Address": "172.17.0.2/16",
                "IPv6Address": ""
            }
        },
        "Options": {
            "com.docker.network.bridge.default_bridge": "true",
            "com.docker.network.bridge.enable_icc": "true",
            "com.docker.network.bridge.enable_ip_masquerade": "true",
            "com.docker.network.bridge.host_binding_ipv4": "0.0.0.0",
            "com.docker.network.bridge.name": "docker0",
            "com.docker.network.driver.mtu": "1500"
        },
        "Labels": {}
    }
]
- 同在
default bridge网络中的容器,只能通过ip addr互相通信(communicate) docker
default bridge网络不支持自动发现(automatic service discovery)。- 如果你想通过
容器名(container name)解析(resolve)容器的ip addr,则需要使用自定义网络 - 或者,在启动容器的时候使用
--link标签。 - 不推荐在
default bridge以外的网络中使用--link。--link以后可能会被废除。
- 如果你想通过
使用
docker attach <container_name>/<container_id>进入一个正在运行的容器pingcontainer2 的 ip 地址(172.17.0.3/16),通pingcontainer2 的 容器名(container2),不通- 查看 container1 的
/etc/hosts文件
$ docker attach container1
/ # ifconfig
eth0      Link encap:Ethernet  HWaddr 02:42:AC:11:00:02
          inet addr:172.17.0.2  Bcast:0.0.0.0  Mask:255.255.0.0
          UP BROADCAST RUNNING MULTICAST  MTU:1500  Metric:1
          RX packets:10 errors:0 dropped:0 overruns:0 frame:0
          TX packets:0 errors:0 dropped:0 overruns:0 carrier:0
          collisions:0 txqueuelen:0
          RX bytes:828 (828.0 B)  TX bytes:0 (0.0 B)

lo        Link encap:Local Loopback
          inet addr:127.0.0.1  Mask:255.0.0.0
          UP LOOPBACK RUNNING  MTU:65536  Metric:1
          RX packets:0 errors:0 dropped:0 overruns:0 frame:0
          TX packets:0 errors:0 dropped:0 overruns:0 carrier:0
          collisions:0 txqueuelen:1
          RX bytes:0 (0.0 B)  TX bytes:0 (0.0 B)

/ # ping -c 3 172.17.0.3
PING 172.17.0.3 (172.17.0.3): 56 data bytes
64 bytes from 172.17.0.3: seq=0 ttl=64 time=0.114 ms
64 bytes from 172.17.0.3: seq=1 ttl=64 time=0.079 ms
64 bytes from 172.17.0.3: seq=2 ttl=64 time=0.102 ms

--- 172.17.0.3 ping statistics ---
3 packets transmitted, 3 packets received, 0% packet loss
round-trip min/avg/max = 0.079/0.098/0.114 ms
/ #
/ # ping -c 3 container2
ping: bad address 'container2'
/ #

/ # cat /etc/hosts
127.0.0.1    localhost
::1    localhost ip6-localhost ip6-loopback
fe00::0    ip6-localnet
ff00::0    ip6-mcastprefix
ff02::1    ip6-allnodes
ff02::2    ip6-allrouters
172.17.0.2    b09c8abd1eb1
default bridge支持端口映射(port mapping)default bridge支持使用--link实现通过container name进行容器见的通信。- 更推荐使用
自建网络代替--link
- 更推荐使用
User-defined networks
使用 自定义 bridge 网络
- 支持容器之间可以互相通信
支持
容器名与容器IP的自动 DNS 解析(automatic DNS resolution)可以通过默认的
network driver创建bridge network,overylay network和MACVLAN network.自定网络数量无上限
- 一个容器可以在任意时刻加入
0个或多个网络- 容器
加入或退出网络不需要重启。 - 当一个容器加入
多个网络时, 容器对外交互使用按字母排序( in lexical order)的第一个非内部(non-internal)网络。
- 容器
Bridge networks
自定义 bridge 网络与默认 bridge 网络相似
- 但
增加了一些功能,并且移除了一些老旧的功能
- 使用
docker network create创建网络 - 使用
docker network inspect查看网络信息
$ docker network create --driver bridge isolated_nw
ea31d15e26277e0e7a7f4a8945d5e4cbe2545ab5d4fd3c384e1bec70783475d0

$ docker network inspect isolated_nw
[
    {
        "Name": "isolated_nw",
        "Id": "ea31d15e26277e0e7a7f4a8945d5e4cbe2545ab5d4fd3c384e1bec70783475d0",
        "Created": "2017-09-18T20:33:55.745048069+08:00",
        "Scope": "local",
        "Driver": "bridge",
        "EnableIPv6": false,
        "IPAM": {
            "Driver": "default",
            "Options": {},
            "Config": [
                {
                    "Subnet": "172.21.0.0/16",
                    "Gateway": "172.21.0.1"
                }
            ]
        },
        "Internal": false,
        "Attachable": false,
        "Ingress": false,
        "ConfigFrom": {
            "Network": ""
        },
        "ConfigOnly": false,
        "Containers": {},
        "Options": {},
        "Labels": {}
    }
]
- 创建容器时,使用
--network=<network_name>加入所选网络
$ docker run -itd --rm --network=isolated_nw --name=container3 busybox

ac378978b8da5e32ebe3289bc7f2a151f4b2349c06fc7136b78052d47aeab403
$
$ docker network inspect isolated_nw
[
    {
        "Name": "isolated_nw",
        "Id": "ea31d15e26277e0e7a7f4a8945d5e4cbe2545ab5d4fd3c384e1bec70783475d0",
        "Created": "2017-09-18T20:33:55.745048069+08:00",
        "Scope": "local",
        "Driver": "bridge",
        "EnableIPv6": false,
        "IPAM": {
            "Driver": "default",
            "Options": {},
            "Config": [
                {
                    "Subnet": "172.21.0.0/16",
                    "Gateway": "172.21.0.1"
                }
            ]
        },
        "Internal": false,
        "Attachable": false,
        "Ingress": false,
        "ConfigFrom": {
            "Network": ""
        },
        "ConfigOnly": false,
        "Containers": {
            "ac378978b8da5e32ebe3289bc7f2a151f4b2349c06fc7136b78052d47aeab403": {
                "Name": "container3",
                "EndpointID": "7b6d9f64f1631656e56d5368070a69ed204502b36e0871b88fee4a2902ee6775",
                "MacAddress": "02:42:ac:15:00:02",
                "IPv4Address": "172.21.0.2/16",
                "IPv6Address": ""
            }
        },
        "Options": {},
        "Labels": {}
    }
]
就 bridge 网络而言
- 在同一
宿主机上的容器被创建后,可以立即与彼此通信。 bridge网络与外部(external)网络隔离。
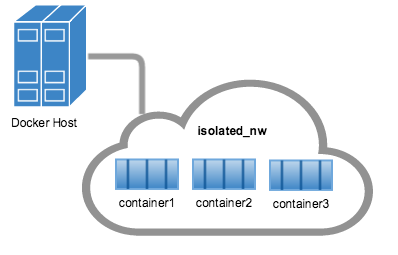
user-defined bridge网络,不支持--link- 可以为网络中的容器
expose和publish端口expose对外暴露端口publish映射宿主机端口到容器暴露的端口
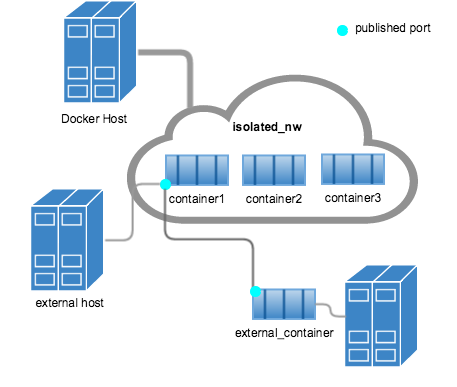
bridge network适合在单宿主机上创建一个相对较小的网络。- 如果要创建一个跨
多宿主机的大型网络,可以通过overlay网络实现。
The docker_gwbridge network
docker_gwbridge 网络是一个 本地桥接网络(local bridge network); 在以下两种情况下,有 Docker 自动创建:
- 当
初始化(initialize)或加入(join)一个swarm, docker 会创建一个docker_gwbridge网络,并通过该网络在不同主机的swarm nodes之间通信。 - 当容器不能提供外部链接的时候,除了容器的本身的网络之外, Docker 还会将容器连接到
docker_gwbridge网络中, 这样容器就可以连接到外部网络或其他swarm nodes。
- 可以提前创建一个
docker_gwbridge网络,并设置自动有配置(custom configuration) - 否认, Docker 会在需要的时候自行创建。
举个例子,如何创建一个 docker_gwbridge 网络
$ docker network create --subnet 172.30.0.0/16 \
                        --opt com.docker.network.bridge.name=docker_gwbridge \
                        --opt com.docker.network.bridge.enable_icc=false \
                        docker_gwbridge
ebbab3861c25cf862c2733602f46c147aab41c701321319c7a6d03907a22850f

$ docker network inspect docker_gwbridge
[
    {
        "Name": "docker_gwbridge",
        "Id": "ebbab3861c25cf862c2733602f46c147aab41c701321319c7a6d03907a22850f",
        "Created": "2017-09-18T21:09:59.948604073+08:00",
        "Scope": "local",
        "Driver": "bridge",
        "EnableIPv6": false,
        "IPAM": {
            "Driver": "default",
            "Options": {},
            "Config": [
                {
                    "Subnet": "172.30.0.0/16"
                }
            ]
        },
        "Internal": false,
        "Attachable": false,
        "Ingress": false,
        "ConfigFrom": {
            "Network": ""
        },
        "ConfigOnly": false,
        "Containers": {},
        "Options": {
            "com.docker.network.bridge.enable_icc": "false",
            "com.docker.network.bridge.name": "docker_gwbridge"
        },
        "Labels": {}
    }
]
- 当使用
overlay网络时,docker_gwbridge始终会出现
Overlay networks in swarm mode
You can create an overlay network on a manager node running in swarm mode without an external key-value store. The swarm makes the overlay network available only to nodes in the swarm that require it for a service. When you create a service that uses the overlay network, the manager node automatically extends the overlay network to nodes that run service tasks.
使用 swarm mode时,
- 通过
manager node创建一个overlay网络,且不使用外部key-value 存储 - 只有加入
swarm了的node运行相同服务时,overlay网络才会生效。 manager node自动将overlay网络扩展到所有运行相同服务的node
举个例子,创建一个 overlay 网络,并用于 swarm .
## 当前主机必须为 manager node 才能创建 overlay 网络 ,否则会报错。
$ docker network create     \
      --driver overlay      \
      --subnet 10.0.9.0/24  \
      my-multi-host-network

#### 报错
Error response from daemon: This node is not a swarm manager. Use "docker swarm init" or "docker swarm join" to connect this node to swarm and try again.


## 初始化 swarm
$ docker swarm init  --advertise-addr 192.168.56.212
Swarm initialized: current node (s9c14hz5hfwqmvvl2spe6xkri) is now a manager.

To add a worker to this swarm, run the following command:

    docker swarm join --token SWMTKN-1-5p9kychp1zobk33828qqallmoz35y8qqe2xh60mj66s8n2ly3o-3pc84g6dcrwdtnk96jtfgrr24 192.168.56.212:2377

To add a manager to this swarm, run 'docker swarm join-token manager' and follow the instructions.


## 创建 overlay 网络
$ docker network create      \
       --driver overlay      \
       --subnet 10.0.9.0/24  \
       my-multi-host-network
wy9ddlzjyx6ljetv6f134dapq


## 在 overlay 网络上创建一个 service
$ docker service create --replicas 2 --network my-multi-host-network --name my-web nginx
ws6vwpptohjutafbaxzxonw49
Since --detach=false was not specified, tasks will be created in the background.
In a future release, --detach=false will become the default.
Onlyswarmservicescanconnect to overlay networks,not standalonecontainers.
An overlay network without swarm mode
- If you are not using Docker Engine in swarm mode, the
overlaynetwork requiresa valid key-value storeservice. - Supported key-value stores include
Consul,Etcd, andZooKeeper(Distributed store). Beforecreating a network in this way, youmust installandconfigureyour chosen key-value store service.- The Docker hosts that you intend to network and the service must
be able to communicate.
Note: Docker Engine running in
swarm modeisnot compatiblewithnetworking with an external key-value store.
- 对于大多数用户而言,不推荐使用这种方式
- 这种方式在以后可能会被废弃。
- 如果还是想使用这种方法,看 guide
Custom network plugins
自己写驱动。
创建方式与其他网络相同。
Embedded DNS server
- Docker daemon runs an
embedded DNSserver which provides DNS resolutionamong containersconnected to thesame user-defined network, so that these containers can resolve containernames to IP addresses. - If the embedded DNS server is
unableto resolve the request, it will beforwardedtoany external DNS serversconfigured for the container. - To facilitate this when the container is created, only the embedded DNS server reachable at
127.0.0.11will be listed in the container’sresolv.conffile. (看不懂)- 在测试机上,所有容器的
resolv.conf都与宿主机的resolv.conf相同
- 在测试机上,所有容器的
- For more information on embedded DNS server on user-defined networks, see embedded DNS server in user-defined networks
Exposing and publishing ports
docker 中有两个机制直接涉及网络端口: expose 和 publish。 适用于 default bridge 和 user-defined bridge 网络
暴露容器端口
Dockerfile中的EXPOSE关键字docker run命令中的--expose标识。- Exposing ports is
a way of documentingwhich ports are used, but doesnotactuallymap or openany ports. - 可选
映射容器端口
Dockerfile中的PUBLISH关键字docker run命令中的--publish / -p标识。- This tells Docker which ports to
openon the container’s network interface - 宿主机随机映射一个高端口号(大于
30000)到容器内部。 - 使用
-p local_port:container_port指定端口映射。 - 不能在
Dockerfile中映射端口,因为无法保证启动容器时端口没被占用。
举个例子,启动容器开放80端口,本机随机映射一个 高端口 37268
$ docker run -itd --rm -p 80 nginx
4a606e40ebfc300fefd8c98c7ee0f46090138fce8bcdd90b46d92910f1980525

$ docker container ls
CONTAINER ID        IMAGE               COMMAND                  CREATED             STATUS              PORTS                   NAMES
4a606e40ebfc        nginx               "nginx -g 'daemon ..."   54 seconds ago      Up 53 seconds       0.0.0.0:32768->80/tcp   unruffled_kowalevsk
在举个例子,指定 宿主机 的 8080 端口映射到 容器 的 80 端口。
$ docker run -itd --rm --name=nginx -p 8080:80 nginx
e398ac99f370a40c321a7dfc2dbc2237c2c6f078691ea8273485804a16de8d01

$ docker container ls
CONTAINER ID        IMAGE               COMMAND                  CREATED             STATUS              PORTS                  NAMES
e398ac99f370        nginx               "nginx -g 'daemon ..."   15 seconds ago      Up 14 seconds       0.0.0.0:8080->80/tcp   nginx


## Use a proxy server with containers

为容器配置 `HTTP`, `HTTPS`, `FTP` 代理服务器。

+ In Docker `17.07` and `higher`, you can `configure the Docker client` `to pass` proxy information to containers `automatically`.

+ In Docker `17.06 and lower`, you must `set` appropriate `environment` variables `within the container`. You can do this when you build the image (which makes the image less portable) or when you create or run the container.


### Configure the Docker Client

> **Edge only**: This option is only available in Docker CE Edge versions. See Docker CE Edge.

+ 编辑文件 `~/.config.json`, 启动容器的的用户家目录。
  + 配置如下,按需求替换 `httpPorxy` 为 `httpsProxy` 或 `ftpProxy`
  + 可以同时配置多个代理服务器
+ 启动容器时,会自动为容器添加代理

```json
{
  "proxies":
  {
    "httpProxy": "http://127.0.0.1:3001",
    "noProxy": "*.test.example.com,.example2.com"
  }
}
Set the environment variables manually
- 在使用
dockerfile创建镜像时 - 在使用
--env标识启动容器时 - 可以同时指定多个
- 17.07 版本以后,应该使用上述配置方式实现。
| variable | dockerfile example |
docker run Example |
|---|---|---|
| HTTP_PROXY | ENV HTTP_PROXY "http://127.0.0.1:3001" |
--env HTTP_PROXY "http://127.0.0.1:3001" |
| HTTPS_PROXY | ENV HTTPS_PROXY "https://127.0.0.1:3001" |
--env HTTPS_PROXY "https://127.0.0.1:3001" |
| FTP_PROXY | ENV FTP_PROXY "ftp://127.0.0.1:3001" |
--env FTP_PROXY "ftp://127.0.0.1:3001" |
| NO_PROXY | ENV NO_PROXY "*.test.example.com,.example2.com" |
--env NO_PROXY "*.test.example.com,.example2.com" |
Links
--link实现了在default bridge网络中,容器之间使用容器名进行通信。- 尽量避免使用
--link
更多 Legacy Links
Docker and iptables
- 在
linux 主机中, docker 使用iptables管理网络设备,包括routing,port forwarding,network address translate(NAT)和其他 - docker 会修改
iptables- 在启动或关闭
映射端口的容器时 - 创建或修改网络
- 容器加入网络
- 其他网络相关操作
- 在启动或关闭
iptables需要开机启动run-level 3- 或者网络初始化后启动
Docker dynamically manages iptables rules for the daemon, as well as your containers, services, and networks. In Docker 17.06 and higher, you can add rules to a new table called DOCKER-USER, and these rules will be loaded before any rules Docker creates automatically. This can be useful if you need to pre-populate iptables rules that need to be in place before Docker runs.