stack
Introduction
A stack is a group of interrelated(相关的) services that share dependencies, and can be orchestrated(编排) and scaled together. A single stack is capable of defining(定义) and coordinating(协调) the functionality of an entire application (though very complex applications may want to use multiple stacks).
所以, stack 就是,不同任务的调度器。
发布 stack 使用命令 docker stack deploy
Add a new service and redeploy
和 上一节 一样,我们这里需要两个节点 S12 和 S13.
| 节点名 | 节点角色 | IP 地址 | 系统版本 | Docker 版本 |
|---|---|---|---|---|
| S12 | Manager | 192.168.56.212 | Ubuntu 1604.03 | Docker-ce 17.06 |
| S12 | Worker | 192.168.56.213 | Ubuntu 1604.03 | Docker-ce 17.06 |
上一节中,最后已经删除了 stack, 退出了 swarm。
创建集群
注意执行命令的机器
# 创建集群
[user@S012 05.stack_sample]$ docker swarm init --advertise-addr 192.168.56.212

# S13 加入集群
[user@S013 ~]$ docker swarm join --token SWMTKN-1-3096uq30z7u8x5qt5uy7zfhevd5uet5os5s7a84a5b908clxh2-dattjfqr3pw9sjcsqvfiyk4ri 192.168.56.212:2377

# 查看节点信息
[user@S012 05.stack_sample]$ docker node ls
ID                            HOSTNAME            STATUS              AVAILABILITY        MANAGER STATUS
69im9oe8rljfjbh600dnyulks *   S012    Ready               Active              Leader
nqhgz9accdqorokp6ct47c262     S013    Ready               Active

# 创建 stack 服务
[user@S012 05.stack_sample]$ docker stack deploy -c docker-compose.yml getstartedlab
Creating network getstartedlab_webnet
Creating service getstartedlab_web

# 查看 stack 信息
[user@S012 05.stack_sample]$ docker stack  ps getstartedlab
ID                  NAME                  IMAGE                          NODE                DESIRED STATE       CURRENT STATE           ERROR               PORTS
jco8fikcn0zf        getstartedlab_web.1   octowhale/friendlyhello:latest   S013    Running             Running 2 minutes ago
x0w43zxui0oa        getstartedlab_web.2   octowhale/friendlyhello:latest   S012    Running             Running 2 minutes ago
ofbupicgj1af        getstartedlab_web.3   octowhale/friendlyhello:latest   S013    Running             Running 2 minutes ago
30a16pv6ov4k        getstartedlab_web.4   octowhale/friendlyhello:latest   S013    Running             Running 2 minutes ago
iv33enuysiu2        getstartedlab_web.5   octowhale/friendlyhello:latest   S012    Running             Running 2 minutes ago
更新 docker-compose 文件
# docker-compose-visualizer.yml
version: "3"
services:
  web:
    # replace username/repo:tag with your name and image details
    image: username/repo:tag
    deploy:
      replicas: 5
      restart_policy:
        condition: on-failure
      resources:
        limits:
          cpus: "0.1"
          memory: 50M
    ports:
      - "80:80"
    networks:
      - webnet
  visualizer:
    image: dockersamples/visualizer:stable
    ports:
      - "8080:8080"
    volumes:
      - "/var/run/docker.sock:/var/run/docker.sock"
    deploy:
      placement:
        constraints: [node.role == manager]
    networks:
      - webnet
networks:
  webnet:
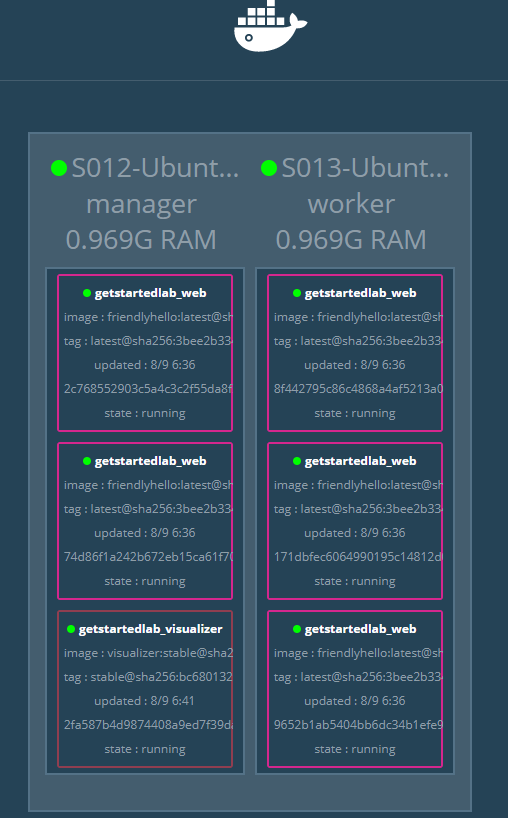
The only thing new here is the peer service to web, named visualizer. You’ll see two new things here:
- a
volumeskey, giving the visualizer access to the host’s socket file for Docker, - and a
placementkey, ensuring that this service only ever runs on a swarm manager – never a worker. That’s because this container, built from an open source project created by Docker, displays Docker services running on a swarm in a diagram.
重新执行 docker stack deploy 更新 getstartedlab 服务。
# 更新 getstartedlab
[user@S012 05.stack_sample]$ docker stack deploy -c docker-compose-visualizer.yml getstartedlab
Updating service getstartedlab_web (id: 7m4i1ily612f8mk9jh7pt7jpv)
Creating service getstartedlab_visualizer

# 查看节点信息
[user@S012 05.stack_sample]$ docker stack ps getstartedlab
ID                  NAME                         IMAGE                             NODE                DESIRED STATE       CURRENT STATE            ERROR               PORTS
7p8pt9dqp2ww        getstartedlab_visualizer.1   dockersamples/visualizer:stable   S012    Running             Running 16 seconds ago
jco8fikcn0zf        getstartedlab_web.1          octowhale/friendlyhello:latest      S013    Running             Running 5 minutes ago
x0w43zxui0oa        getstartedlab_web.2          octowhale/friendlyhello:latest      S012    Running             Running 5 minutes ago
ofbupicgj1af        getstartedlab_web.3          octowhale/friendlyhello:latest      S013    Running             Running 5 minutes ago
30a16pv6ov4k        getstartedlab_web.4          octowhale/friendlyhello:latest      S013    Running             Running 5 minutes ago
iv33enuysiu2        getstartedlab_web.5          octowhale/friendlyhello:latest      S012    Running             Running 5 minutes ago
可以看到 getstartedlab_visualizer.1 只启动了一个,并且运行在 S12 上。
The visualizer is a standalone service that can run in any app that includes it in the stack. It doesn’t depend on anything else.
通过 http://192.168.56.212:8080/ 或 http://192.168.56.213:8080/ 都可以看到 visualizer 界面。因为 swarm 共享了入口(ingress routing mesh)。

Persist the data
为容器添加持久化数据 redis。
修改 docker-compose.yml 增加 redis 部分
# docker-compose-visualizer-redis.yml
version: "3"
services:
  web:
    # replace username/repo:tag with your name and image details
    image: username/repo:tag
    deploy:
      replicas: 5
      restart_policy:
        condition: on-failure
      resources:
        limits:
          cpus: "0.1"
          memory: 50M
    ports:
      - "80:80"
    networks:
      - webnet
  visualizer:
    image: dockersamples/visualizer:stable
    ports:
      - "8080:8080"
    volumes:
      - "/var/run/docker.sock:/var/run/docker.sock"
    deploy:
      placement:
        constraints: [node.role == manager]
    networks:
      - webnet
  redis:
    image: redis
    ports:
      - "6379:6379"
    volumes:
      - ./data:/data
    deploy:
      placement:
        constraints: [node.role == manager]
    networks:
      - webnet
networks:
  webnet:
here in our Compose file we expose it from the host to the world, so you can actually enter the IP for any of your nodes into Redis Desktop Manager and manage this Redis instance, if you so choose.
Most importantly, there are a couple of things in the redis specification that make data persist between deployments of this stack:
- redis always
runs on the manager, so it’s always using thesame filesystem. - redis accesses an arbitrary(任意) directory in the host’s file system
as /data insidethe container, which is where Redis stores data.
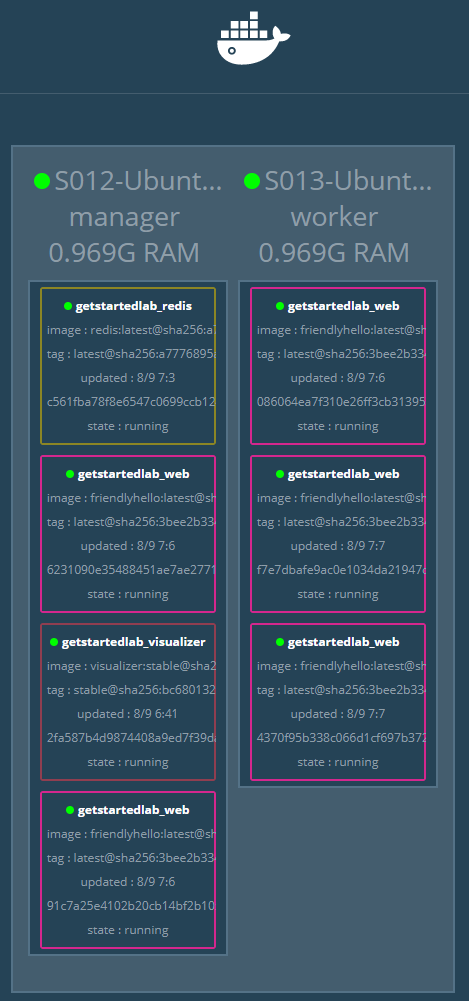
Together, this is creating a “source of truth” in your host’s physical filesystem for the Redis data. Without this, Redis would store its data in /data inside the container’s filesystem, which would get wiped out if that container were ever redeployed.
This source of truth has two components:
- The placement constraint you put on the Redis service, ensuring that it
always uses the same host. - The volume you created that lets the container access
./data (on the host)as/data (inside the Redis container). While containers come and go, the files stored on ./data on the specified host will persist, enabling continuity.(如果不映射本地路径到 redis 容器 /data 中,那么当容器关闭后,redis 数据就会消失,无法达到数据持久化的目的)
更新 getstartedlab 服务
# 创建 redis 数据目录
[user@S012 05.stack_sample]$ mkdir -p ./data

# 更新服务
[user@S012 05.stack_sample]$ docker stack deploy -c docker-compose-visualizer-redis.yml getstartedlab
Updating service getstartedlab_web (id: 7m4i1ily612f8mk9jh7pt7jpv)
Updating service getstartedlab_visualizer (id: gjxq5cczcypoeoad3e41befzy)
Creating service getstartedlab_redis
访问 http://192.168.56.212:8800/ 就可以看到页面已经支持计数器了。

Also, check the visualizer at port 8080 on either node’s IP address, and you’ll see the redis service running along with the web and visualizer services.
