Work with network commands
https://docs.docker.com/engine/userguide/networking/work-with-networks/
本文案例都是在 bridge 网络下实现的。如果要了解 overlay 网络,看 003.get_start_with_multi-host_networking.md
可用命令:
$ docker network --help

Usage:    docker network COMMAND

Manage networks

Options:
      --help   Print usage

Commands:
  connect     Connect a container to a network
  create      Create a network
  disconnect  Disconnect a container from a network
  inspect     Display detailed information on one or more networks
  ls          List networks
  prune       Remove all unused networks
  rm          Remove one or more networks

Run 'docker network COMMAND --help' for more information on a command.
Create networks
- 安装 Docker 之后,会默认创建一个
bridge, 网络接口是docker0。这个你已经知道了。 使用
docker network create创建自定义bridge或overlay网络。bridge网络在单机环境overlay网络可以跨多主机。但需要key-value store的支持。
创建网络
在不指定 --driver 的情况下,默认使用 bridge driver。
$ docker network create simple-network
544c3cd2638b03f647f4d2332cc261c6a3898dc454a6b324b91878efe5047049

$ docker network inspect simple-network
[
    {
        "Name": "simple-network",
        "Id": "544c3cd2638b03f647f4d2332cc261c6a3898dc454a6b324b91878efe5047049",
        "Created": "2017-09-19T11:24:42.370489908+08:00",
        "Scope": "local",
        "Driver": "bridge",
        "EnableIPv6": false,
        "IPAM": {
            "Driver": "default",
            "Options": {},
            "Config": [
                {
                    "Subnet": "172.18.0.0/16",
                    "Gateway": "172.18.0.1"
                }
            ]
        },
        "Internal": false,
        "Attachable": false,
        "Ingress": false,
        "ConfigFrom": {
            "Network": ""
        },
        "ConfigOnly": false,
        "Containers": {},
        "Options": {},
        "Labels": {}
    }
]
与创建 bridge 网络不同,创建 overlay 网络需要一些前置条件,包括:
- 可访问的
key-value store,支持使用Consul,Etcd,Zookeeper - 集群中的所有主机都可以与
key-value store通信 - swarm 模式下,适当的配置所有主机
docker engine的daemon。
dockerd 对 overlay 网络支持的参数,包括:
--cluster-store--cluster-store-opt--cluster-advertise
- 当创建网络时,
docker engine会创建一个非覆盖子网(non-overlapping subnetwork)- 非覆盖子网 指的是通过
docker engine创建的 - 与
主机网络无关
- 非覆盖子网 指的是通过
- 在创建的时候,可以通过
--subnet指定网络范围- 在创建
bridge网络时,只能指定一个网段。 - 但创建
overlay网络时,可以创建多个网段。
- 在创建
注意: 强烈推荐使用
--subnet。 如果不适用--subnet的话,默认创建的子网可能会与物理主机所在的子网重叠。从而产生不可预料的问题。
除了可以使用 --subnet,还可以:
$ docker network create --help

Usage:    docker network create [OPTIONS] NETWORK

Create a network

Options:
      --attachable             Enable manual container attachment
      --aux-address map        Auxiliary IPv4 or IPv6 addresses used by Network driver (default map[])
      --config-from string     The network from which copying the configuration
      --config-only            Create a configuration only network
  -d, --driver string          Driver to manage the Network (default "bridge")
      --gateway stringSlice    IPv4 or IPv6 Gateway for the master subnet
      --help                   Print usage
      --ingress                Create swarm routing-mesh network
      --internal               Restrict external access to the network
      --ip-range stringSlice   Allocate container ip from a sub-range
      --ipam-driver string     IP Address Management Driver (default "default")
      --ipam-opt map           Set IPAM driver specific options (default map[])
      --ipv6                   Enable IPv6 networking
      --label list             Set metadata on a network
  -o, --opt map                Set driver specific options (default map[])
      --scope string           Control the network\'s scope
      --subnet stringSlice     Subnet in CIDR format that represents a network segment
创建一个 overlay 网络
在执行以下命令前,须确认命令中的 ip 段 不会覆盖你的主机网络。
## 创建一个覆盖网络
$ docker network create -d overlay \
 --subnet=192.168.0.0/16 \
 --subnet=192.170.0.0/16 \
 --gateway=192.168.0.100 \
 --gateway=192.170.0.100 \
 --ip-range=192.168.1.0/24 \
 --aux-address="my-route=192.168.1.5" --aux-address="my-switch=192.168.1.6" \
 --aux-address="my-printer=192.170.1.5" --aux-address="my-nas=192.170.1.6" \
 my-multihost-network

## 由于没有 key-value store 也不在 swarm mode 下因此报错
Error response from daemon: This node is not a swarm manager. Use "docker swarm init" or "docker swarm join" to connect this node to swarm and try again.

## 初始化 swarm
$ docker swarm init --advertise-addr 192.168.56.205

## 重新创建
$ docker network create -d overlay \
  --subnet=192.168.0.0/16 \
  --subnet=192.170.0.0/16 \
  --gateway=192.168.0.100 \
  --gateway=192.170.0.100 \
  --ip-range=192.168.1.0/24 \
  --aux-address="my-route=192.168.1.5" --aux-address="my-switch=192.168.1.6" \
  --aux-address="my-printer=192.170.1.5" --aux-address="my-nas=192.170.1.6" \
  my-multihost-network

uzjd9y9dneh63s38bf17zncg7
创建用户网络时,可以传递额外的选项。 bridge 支持:
| Option | Equivalent | Equivalent |
|---|---|---|
com.docker.network.bridge.name |
- |
网络名 |
com.docker.network.bridge.enable_ip_masquerade |
--ip-masq |
启用IP伪装 |
com.docker.network.bridge.enable_icc |
--icc |
开启或关闭内部容器连通性 |
com.docker.network.bridge.host_binding_ipv4 |
--ip |
binding 容器端口时默认使用的 宿主机IP |
com.docker.network.driver.mtu |
--mtu |
设置容器网络 MTU |
The com.docker.network.driver.mtu option is also supported by the overlay driver
所有 network driver 共用参数
--internal: Restrict(限制) external access to the network--ipv6: 启动 IPv6 网络
创建网络时,使用 -o 将端口映射时绑定到指定 IP (uses -o to bind to a specific IP address when binding ports)
- 网络创建时,
host_binding_ipv4不存在是不会报错的 - 容器创建时,
host_binding_ipv4不存在,无法正常创建容器
## 绑定一个不存在的 宿主机 IP,不会报错。
$ docker network create     -o "com.docker.network.bridge.host_binding_ipv4"="172.233.0.1"     simple-network2
f0d572fb3a0f903f4d3a37d400b815d17375735518bcfddc824b582123f4732f

## 查看网络信息时,可以看出,网段和 bind 的ip没有特别的的关系
$ docker network inspect simple-network2
[
    {
        "Name": "simple-network2",
        "Id": "f0d572fb3a0f903f4d3a37d400b815d17375735518bcfddc824b582123f4732f",
        "Created": "2017-09-19T13:10:03.303424685+08:00",
        "Scope": "local",
        "Driver": "bridge",
        "EnableIPv6": false,
        "IPAM": {
            "Driver": "default",
            "Options": {},
            "Config": [
                {
                    "Subnet": "172.21.0.0/16",
                    "Gateway": "172.21.0.1"
                }
            ]
        },
        "Internal": false,
        "Attachable": false,
        "Ingress": false,
        "ConfigFrom": {
            "Network": ""
        },
        "ConfigOnly": false,
        "Containers": {},
        "Options": {
            "com.docker.network.bridge.host_binding_ipv4": "172.233.0.1"
        },
        "Labels": {}
    }
]

## network 创建成功后,也没有自动生成任何有关 172.233 的 ip 信息
$ ip a |grep 172.233


## 在 simple-network2 中创建容器时,由于无法将 映射的端口绑定到 172.233.0.1 上,因此报错,创建失败
$ docker run --rm --network=simple-network2 -itd --name=nginx  -p 8081:80 nginx
e5b03e37ed77dd5bb8d9fefe1d059506d10db9b44e4bf4451b9772fc3614125e
docker: Error response from daemon: driver failed programming external connectivity on endpoint nginx (6f4c9e05e494cce098563d99777f105ede1485b326df187155936cb233fa6d97): Error starting userland proxy: listen tcp 172.233.0.1:8081: bind: cannot assign requested address.
正常绑定一个 宿主机 IP
$ docker network create -o "com.docker.network.bridge.host_binding_ipv4"="192.168.56.205" simple-network3
5c1a9d5eed7316ef4fc8d05a76056750df97c08bc07a67a451053d256366352a

$ docker run --rm --network=simple-network3 -itd --name=nginx  -p 8081:80 nginx
cc0f03ef9cc06d6477dfde1ce1807326b995bd6c991aa96734bdeae10e872155

$ netstat -tunpl
(Not all processes could be identified, non-owned process info
 will not be shown, you would have to be root to see it all.)
Active Internet connections (only servers)
Proto Recv-Q Send-Q Local Address           Foreign Address         State       PID/Program name
tcp        0      0 192.168.56.205:8081     0.0.0.0:*               LISTEN      -

$ ip a  |grep 'inet '
    inet 127.0.0.1/8 scope host lo
    inet 10.0.2.15/24 brd 10.0.2.255 scope global enp0s3
    inet 192.168.56.205/24 brd 192.168.56.255 scope global enp0s8
    inet 172.20.0.1/16 scope global br-792f2fc2cdc4
    inet 172.17.0.1/16 scope global docker0
    inet 172.19.0.1/16 scope global docker_gwbridge
    inet 172.18.0.1/16 scope global br-5c1a9d5eed73

## 只能通过 host_binding_ipv4 指定的ip访问
$ curl 127.0.0.1:8081
curl: (7) Failed to connect to 127.0.0.1 port 8081: Connection refused

$ curl 192.168.56.205:8081
<!DOCTYPE html>
...省略...
</html>
Connect containers
- 一个容器可以加入多个不同类型的网络
- 一旦容器加入网络,通网络之间的容器就可以通过
容器名或容器ip进行通信。
For overlay networks or custom plugins that support multi-host connectivity, 容器在相同的网络,但属于不同的主机,也可以相互通信。
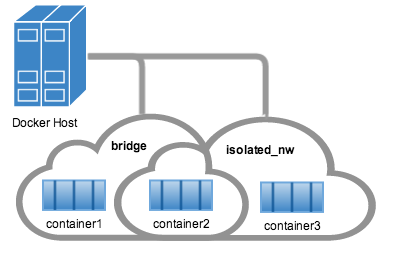
Basic container networking example
- 在默认网络中,创建
container1和container2
$ docker run -itd --name=container1 busybox
$ docker run -itd --name=container2 busybox
- 创建一个用户隔离网络
$ docker create network -d bridge --subnet 172.25.0.0/16 isolated_nw 将
container2加入到isolated_nw网络 。创建
container3,并加入isolated_nw,使用--ip指定 ip 地址。$ docker run --network=isolated_nw --ip=172.52.3.3 -itd --name=container3 busybox使用
--ip或--ip6给容器指定 IP 地址- 在
user-defined network中,指定容易ip后,重启容器会保留指定的IP。 - docker daemon 重启后,只有默认网络保留中的指定 ip 会被保留。
- 因为
user-defined network可能发生变化。
- 因为
- 在
查看
container3的网络信息$ docker inspect --format='' container3查看
container2的网络信息,并使用python做美化输出$ docker inspect --format='' container2 | python -m json.tool
注意, 容器所属网络如下
container1只连接到default bridgecontainer2同时连接到default bridge和isolated_nwcontainer3只连接到isolated_nw
使用
docker attach <container_name>进入container2$ docker attach container2在容器中使用
ifconfig命令查看容器网络信息docker 嵌入的 dns 服务器可以将
user-defined网络中的容器名解析为容器IP。 因此,可以通过container2ping 通contaienr3
## in container2
/ # ping -w 4 container3
PING container3 (172.25.3.3): 56 data bytes
64 bytes from 172.25.3.3: seq=0 ttl=64 time=0.070 ms
64 bytes from 172.25.3.3: seq=1 ttl=64 time=0.080 ms
64 bytes from 172.25.3.3: seq=2 ttl=64 time=0.080 ms
64 bytes from 172.25.3.3: seq=3 ttl=64 time=0.097 ms

--- container3 ping statistics ---
4 packets transmitted, 4 packets received, 0% packet loss
round-trip min/avg/max = 0.070/0.081/0.097 ms
由于 container2 和 container1 属于 default bridge network, 因此不能直接通过 容器名 进行交互。 但可以使用 容器IP
## in container2
/ # ping -w 4 container1
ping: bad address 'container1'

/ # ping -w 4 172.17.0.2
PING 172.17.0.2 (172.17.0.2): 56 data bytes
64 bytes from 172.17.0.2: seq=0 ttl=64 time=0.095 ms
64 bytes from 172.17.0.2: seq=1 ttl=64 time=0.075 ms
64 bytes from 172.17.0.2: seq=2 ttl=64 time=0.072 ms
64 bytes from 172.17.0.2: seq=3 ttl=64 time=0.101 ms

--- 172.17.0.2 ping statistics ---
4 packets transmitted, 4 packets received, 0% packet loss
round-trip min/avg/max = 0.072/0.085/0.101 ms
- 由于
container1和container3不再同一个网络,因此即使使用容器 IP也无法通信
$ docker attach container3

$ ping 172.17.0.2
PING 172.17.0.2 (172.17.0.2): 56 data bytes
^C

--- 172.17.0.2 ping statistics ---
10 packets transmitted, 0 packets received, 100% packet loss
注意:即使容器不是
running状态,也可以将其连接到某个网络。但
docker network inspect <network_name>只显示running状态的容器信息。
Link containers without using user-defined networks
default bridge network中的容器不能自动将容器名解析为容器 IPdefault bridge network中的容器相互使用容器名进行访问,需要使用--link。- 只建议将
--link用在这里。 - 建议使用
user-defined network替代--link
- 只建议将
为 default bridge network 中的容器使用 --link 之后:
- 可以解析
contaner name为container ip了 - 可以为容器指定一个
网络别名( network alias),--link=container_name:alias_name - 安全的容器连接性,(in isolation via
--icc=false) - 环境变量注入(environment variable injection)
再次强调,以下功能在 user-defined network 中不需要额外配置就可以使用。此外,动态的加入或退出多个网络。 Additionally, you get the ability to dynamically attach to and detach from multiple networks.
- 内嵌 DNS, 自动
容器名解析 - 支持
--link的别名功能 - automatic secured isolated environment for the containers in a network
- 环境变量注入
怎么使用 --link
- 继续之前的案例, 创建
container4并加入isolated_nw,使用--link为container5(尚未创建) 指定别名。
一旦$ docker run --network=isolated_nw -itd --name=container4 --link container5:c5 busyboxcontainer5被创建,container4就能将c5解析到container5的 IP 上。
注意:
在
default bridge network中,使用legacy link创建的link是静态的(static), 且 容器与别名是硬绑定的(hard-binds), 因此能容忍容器重启(restarts)。在
user-defined network中,new link功能支持容器间的动态(dynamic)连接。 因此,支持容器启动,并重新解析容器IP。注意2:
在
default bridge network中,使用legacy link不能为不存在的容器指定别名。在
user-defined network中,使用new link可以为不存在的容器指定别名。
$ docker run -itd --name container4 --link container5:c5 busybox
docker: Error response from daemon: Could not get container for container5.
See 'docker run --help'.

$ docker run -itd --name container4 --network=isolated_nw --link container5:c5 busybox
fcfbe26df2db9b5bc6c9645bc7b32753d5abccc2f74d1f58ca3382692ee1a140
- 创建
container5,加入isolated_nw, 使用--link为container4指定别名$ docker run --network=isolated_nw -itd --name=container5 --link container4:c4 busybox
在创建 container5 之前,container4 不能 ping c5/container5 。 创建之后,二者可以互 ping 了。
Network alias scoping example
--link别名只作用于指定的container,在其他 container中无效。--link别名只作用于指定的network中,即使一个容器处于多个网络,在其他网络中也不能使用别名
书接上文,举个例子
创建一个
bridge网络名为local_alias$ docker network create -d bridge --subnet 172.26.0.0/24 local_alias把
container4和container5分别加入到该网络中,并做别名 ```bash
$ docker network connect --link container5:foo local_alias container4 $ docker network connect --link container4:bar local_alias container5
3. 现在,`container4`, `container5` 都在 `isolated_nw` 和 `local_alias` 网络中。因此,进入 `container4` 可以 ping 通 `container5` 的两个别名。**但是可以看到,两个别名解析的 `IP地址` 是不同的**

```bash
$ docker attach container4

 / # ping -w 4 foo
 PING foo (172.26.0.3): 56 data bytes
 64 bytes from 172.26.0.3: seq=0 ttl=64 time=0.070 ms
 64 bytes from 172.26.0.3: seq=1 ttl=64 time=0.080 ms
 64 bytes from 172.26.0.3: seq=2 ttl=64 time=0.080 ms
 64 bytes from 172.26.0.3: seq=3 ttl=64 time=0.097 ms

 --- foo ping statistics ---
 4 packets transmitted, 4 packets received, 0% packet loss
 round-trip min/avg/max = 0.070/0.081/0.097 ms

 / # ping -w 4 c5
 PING c5 (172.25.0.5): 56 data bytes
 64 bytes from 172.25.0.5: seq=0 ttl=64 time=0.070 ms
 64 bytes from 172.25.0.5: seq=1 ttl=64 time=0.080 ms
 64 bytes from 172.25.0.5: seq=2 ttl=64 time=0.080 ms
 64 bytes from 172.25.0.5: seq=3 ttl=64 time=0.097 ms

 --- c5 ping statistics ---
 4 packets transmitted, 4 packets received, 0% packet loss
 round-trip min/avg/max = 0.070/0.081/0.097 ms
- 将
container5从isolated_nw中退出。 重新在container4中 pingcontainer5中的两个别名。可以看到c5不行了, 但是foo还可以
$ docker network disconnect isolated_nw container5

$ docker attach container4

/ # ping -w 4 c5
ping: bad address 'c5'

/ # ping -w 4 foo
PING foo (172.26.0.3): 56 data bytes
64 bytes from 172.26.0.3: seq=0 ttl=64 time=0.070 ms
64 bytes from 172.26.0.3: seq=1 ttl=64 time=0.080 ms
64 bytes from 172.26.0.3: seq=2 ttl=64 time=0.080 ms
64 bytes from 172.26.0.3: seq=3 ttl=64 time=0.097 ms

--- foo ping statistics ---
4 packets transmitted, 4 packets received, 0% packet loss
round-trip min/avg/max = 0.070/0.081/0.097 ms
Limitations of docker network
docker network 有一些局限性:
环境变量注入(ENVIRONMENT VARIABLE INJECTION)
- 环境变量注入是静态的,且环境变量在容器启动后就不能改变
legacy --link可以共享连接容器之间的所有环境变量,而docker network命令则不同- 当使用
docker network连接容器时,环境变量不会动态的在容器间共享。
使用 网络扩展别名(network-scoped alias)
legacy link提供的传出名称解析(outging name resolution)隔离是基于容器配置的。- 而
network-scoped alias是提供给网络中所有容器的,不支持单向(one-way)隔离。
书接上文,举个例子
- 创建容器
container6,加入isolated_nw网络,并使用--network-alias <alias_name>选项为容器取别名
$ docker run --network=isolated_nw -itd --name=container6 --network-alias app busybox
- 进入
container4中, pingcontainer6的 容器名(container6) 和 别名(app),可以发现都通,且IP地址一样
$ docker attach container4

/ # ping -w 4 app
PING app (172.25.0.6): 56 data bytes
64 bytes from 172.25.0.6: seq=0 ttl=64 time=0.070 ms
64 bytes from 172.25.0.6: seq=1 ttl=64 time=0.080 ms
64 bytes from 172.25.0.6: seq=2 ttl=64 time=0.080 ms
64 bytes from 172.25.0.6: seq=3 ttl=64 time=0.097 ms

--- app ping statistics ---
4 packets transmitted, 4 packets received, 0% packet loss
round-trip min/avg/max = 0.070/0.081/0.097 ms

/ # ping -w 4 container6
PING container5 (172.25.0.6): 56 data bytes
64 bytes from 172.25.0.6: seq=0 ttl=64 time=0.070 ms
64 bytes from 172.25.0.6: seq=1 ttl=64 time=0.080 ms
64 bytes from 172.25.0.6: seq=2 ttl=64 time=0.080 ms
64 bytes from 172.25.0.6: seq=3 ttl=64 time=0.097 ms

--- container6 ping statistics ---
4 packets transmitted, 4 packets received, 0% packet loss
round-trip min/avg/max = 0.070/0.081/0.097 ms
- 将
container6连接到local_alias网络中,并使用--network-alias <alias_name>给容器取一个网络别名。
$ docker network connect --alias scoped-app local_alias container6
现在, 容器所在的网络如下:
container4:isolated_nw,local_aliascontainer5:isolated_nwcontainer6:isolated_nw/app,local_alias/scoped-app现在分别进入
container4和container5中 pingcontainer6的别名scoped-app。 可以发现,别名只对在同一个网络(local_alias)中的contaienr4有效,而对container5无效。
$ docker attach container4

/ # ping -w 4 scoped-app
PING foo (172.26.0.5): 56 data bytes
64 bytes from 172.26.0.5: seq=0 ttl=64 time=0.070 ms
64 bytes from 172.26.0.5: seq=1 ttl=64 time=0.080 ms
64 bytes from 172.26.0.5: seq=2 ttl=64 time=0.080 ms
64 bytes from 172.26.0.5: seq=3 ttl=64 time=0.097 ms

--- foo ping statistics ---
4 packets transmitted, 4 packets received, 0% packet loss
round-trip min/avg/max = 0.070/0.081/0.097 ms

$ docker attach container5

/ # ping -w 4 scoped-app
ping: bad address 'scoped-app'
因此,网络扩展别名 network-scoped alias 生效的条件是: 容器、别名 必须处于同一个 网络 中。
RESOLVE MULTIPLE CONTAINERS TO A SINGLE ALIAS
多个容器可以在 同一个 网络中, 同时 共享 同一个 网络扩展别名。因此,就是先了一个的 DNS 轮询(round-robin) 高可用。这个对某些缓存客户端 ip 的软件可能不适用,比如,nginx
注意: 使用
swarm替代这种dns 轮询高可用。swarm 在外部提供了一个类似
负载均衡器(load-balancing)的功能。 你可以访问 swarm 的任何节点,即使该节点没有提供你所访问的服务 service。docker 也可以将请求转发到任何一个提供了该服务的节点上
书接上文,举个例子
- 创建容器
container7, 加入isolated_nw网络中,并设置网络扩展别名app, 与container6相同。
$ docker run --network=isolated_nw -itd --name=container7 --network-alias app busybox
现在多个容器共享一个别名了,别名会被解析到 其中一个 容器。当其中一个容器不可用的时候,依旧还有另一个容器可以提供服务。
原文如下:
When multiple containers share the same alias, one of those containers will resolve to the alias. If that container is unavailable, another container with the alias will be resolved. This provides a sort of high availability within the cluster.
个人觉得有歧义 这个说法,感觉在两个容器同时存活的时候,这个别名 『只会』解析到固定的一个容器上。当且仅当,这个容器挂掉之后,才会解析到第二个容器上。
这个不符合轮询的定义。也不符合实验结果
$  docker run --rm -it --network isolated_nw --name c4 busybox

/ # ping -c 3 app
PING app (172.20.0.2): 56 data bytes
64 bytes from 172.20.0.2: seq=0 ttl=64 time=0.054 ms
64 bytes from 172.20.0.2: seq=1 ttl=64 time=0.159 ms
64 bytes from 172.20.0.2: seq=2 ttl=64 time=0.153 ms

--- app ping statistics ---
3 packets transmitted, 3 packets received, 0% packet loss
round-trip min/avg/max = 0.054/0.122/0.159 ms

/ # ping -c 3 app
PING app (172.20.0.3): 56 data bytes
64 bytes from 172.20.0.3: seq=0 ttl=64 time=0.050 ms
64 bytes from 172.20.0.3: seq=1 ttl=64 time=0.163 ms
64 bytes from 172.20.0.3: seq=2 ttl=64 time=0.203 ms

--- app ping statistics ---
3 packets transmitted, 3 packets received, 0% packet loss
round-trip min/avg/max = 0.050/0.138/0.203 ms
补充说明
北京-MD-蜗牛
你用的是 ping,你应该用 nslookup 或者 dig 去分析 dns

北京-MD-蜗牛 2017/9/20 8:36:47
另外,你应该使用 docker swarm 中的 service 的副本来做高可用。每个 service 会对应一个 VIP,这样没有 DNS 轮询的麻烦,如果客户端不重新解析,一样可以重定向到新的容器。

北京-MD-蜗牛
ping 并不是一个很好地用来测试 DNS 的工具,因为它有缓存。对于这种高可用的情况下,它不见得每次都会触发 DNS 请求。

北京-MD-蜗牛 2017/9/20 8:49:45
另外,ping 也不适合测试 docker 网络,因为有些情况,比如 IPVS,是4层交换网络,而 ping 只是3层,会导致测试出问题。

北京-MD-蜗牛 2017/9/20 8:50:46
所以一般是 nslookup 测试 dns 是否正常,然后用 curl 之类的进行4层网络的测试。ping 用一下可以,但是如果不通,不意味着 4 层一定不通。如果通,也不见得4层就通
Disconnect containers
使用命令 docker network disconnect <network_name> <container_name> 断开容器网络连接
$ docker network disconnect isolated_nw container2

$ docker inspect --format=''  container2 | python -m json.tool

{
    "bridge": {
        "NetworkID":"7ea29fc1412292a2d7bba362f9253545fecdfa8ce9a6e37dd10ba8bee7129812",
        "EndpointID": "9e4575f7f61c0f9d69317b7a4b92eefc133347836dd83ef65deffa16b9985dc0",
        "Gateway": "172.17.0.1",
        "GlobalIPv6Address": "",
        "GlobalIPv6PrefixLen": 0,
        "IPAddress": "172.17.0.3",
        "IPPrefixLen": 16,
        "IPv6Gateway": "",
        "MacAddress": "02:42:ac:11:00:03"
    }
}


$ docker network inspect isolated_nw

[
    {
        "Name": "isolated_nw",
        "Id": "06a62f1c73c4e3107c0f555b7a5f163309827bfbbf999840166065a8f35455a8",
        "Scope": "local",
        "Driver": "bridge",
        "IPAM": {
            "Driver": "default",
            "Config": [
                {
                    "Subnet": "172.21.0.0/16",
                    "Gateway": "172.21.0.1/16"
                }
            ]
        },
        "Containers": {
            "467a7863c3f0277ef8e661b38427737f28099b61fa55622d6c30fb288d88c551": {
                "Name": "container3",
                "EndpointID": "dffc7ec2915af58cc827d995e6ebdc897342be0420123277103c40ae35579103",
                "MacAddress": "02:42:ac:19:03:03",
                "IPv4Address": "172.25.3.3/16",
                "IPv6Address": ""
            }
        },
        "Options": {}
    }
]
当一个容器从一个网络中退出之后,就不能在通过 该网络 与其他网络中的容器通信了。
- 使用命令
docker container stop <container_name>关闭容器 - 使用命令
docker container rm <container_name>删除容器
Handle stale network endpoints
在某些情况下,例如,在多主机网络中,非正常重启 docker daemon 进程,可能会造成 daemon 不能完全清理 失效(stale) 的 终端节点(endpoint)。 当网络中存在失效节点是,当一个新容器加入到该网络,且容器与失效节点名相同的名称时,会导致一下问题:
原文:
In some scenarios, such as ungraceful docker daemon restarts in a multi-host network, the daemon cannot clean up stale connectivity endpoints. Such stale endpoints may cause an error if a new container is connected to that network with the same name as the stale endpoint:
ERROR: Cannot start container bc0b19c089978f7845633027aa3435624ca3d12dd4f4f764b61eac4c0610f32e: container already connected to network multihost
使用命令 docker network disconnect -f <network_name> <container_name> 强制将容器从网络中删除
$ docker run -d --name redis_db --network multihost redis

ERROR: Cannot start container bc0b19c089978f7845633027aa3435624ca3d12dd4f4f764b61eac4c0610f32e: container already connected to network multihost

$ docker rm -f redis_db

$ docker network disconnect -f multihost redis_db

$ docker run -d --name redis_db --network multihost redis

7d986da974aeea5e9f7aca7e510bdb216d58682faa83a9040c2f2adc0544795a
Remove a network
当所有容器都退出网络之后,可以将网络删除。否则,会报错。
使用命令 docker network rm <network_name> 删除网络。